Integrate MoEngage with SMSGATEWAYHUB SMS
To integrate MoEngage with SMSGATEWAYHUB SMS, perform the following steps:
- Sign in to your MoEngage account.
- On the MoEngage dashboard, navigate to Settings.
- Go to SMS & Connectors and then click SMS CONNECTOR CONFIG.
- Click + or CREATE corresponding to Custom Connectors. The New Custom page appears.
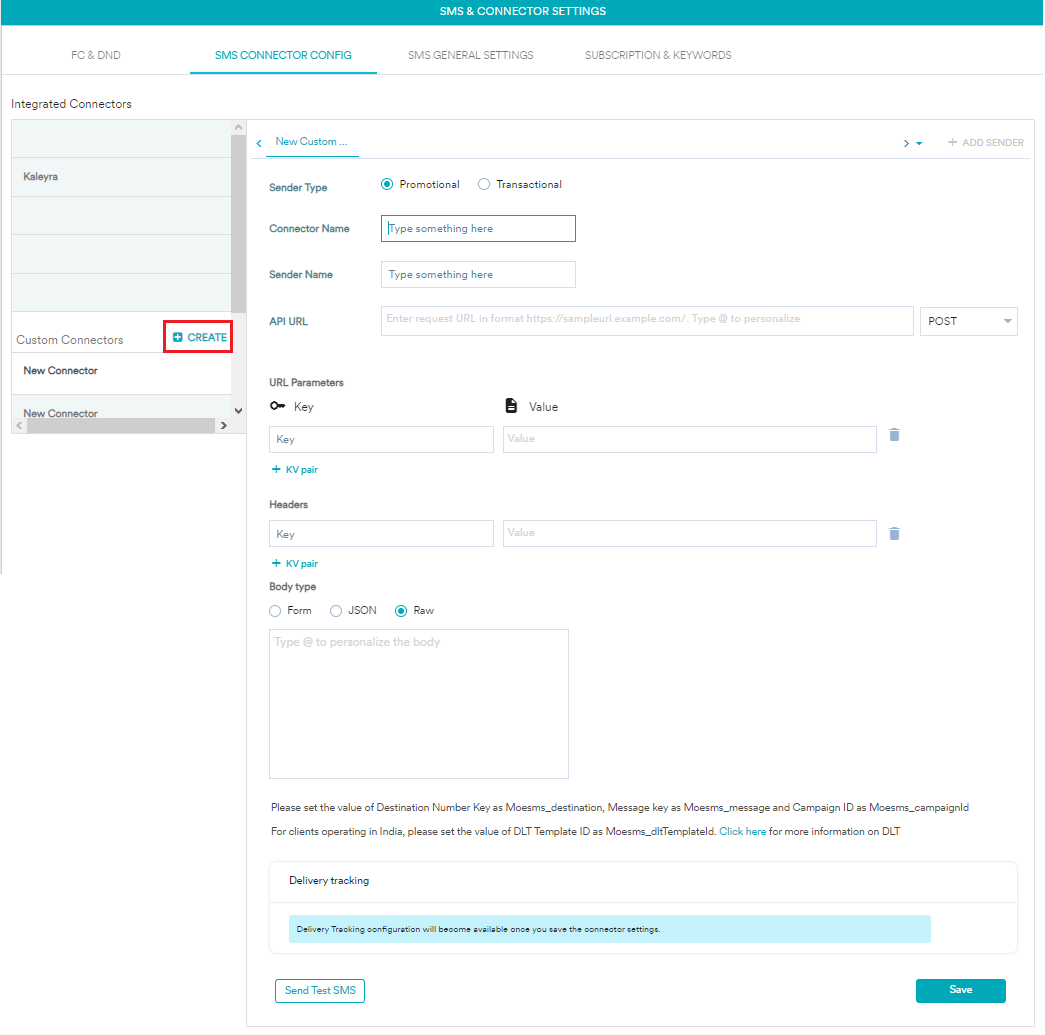
- Select the Sender Type as Promotional or Transactional according to the type of traffic you send from the platform.Step 1: Set the Connector
|
Field |
Description |
|
Connector Name |
Write the name to identify the connector - e.g. SMSGATEWAYHUB |
|
Sender Name |
Write the name to identify the sender |
Step 2: Configure the API URL
- This field contains information about the URL that should be used to send an API request to the Sender. In the API URL field paste the below
API URL-
https://www.smsgatewayhub.com/api/mt/SendSMS?APIKey=yourapicode&senderid=TESTIN&channel=2&DCS=0&flashsms=0&number=91989xxxxxxx&text=test message&route=1&EntityId=Registered-Entity-Id&dlttemplateid=Registered-DLT-Template-Id- Select: GET as a Method
- Here is the description of the above API URL Parameters:
|
APIKey |
Enter your SMSGATEWAYHUB APIKey |
|
Sender |
Enter your DLT-approved Header / Sender ID |
|
number |
|
|
Channel |
2 (For Transactional Messages) 1 (For Promotional Messages) |
|
Message |
|
|
dlttemplateid |
(This is only mandatory for users sending messages to Indian Numbers) |
|
Response |
|
|
DCS |
|
Parameter Reference Table
| Parameter | Type | Description |
|---|---|---|
| User | string | Your system login name |
| Password | string | Your system password |
| senderid | string | Approved sender id(6 characters string only). |
| channel | string | Message channel Promotional=1 or Transactional=2 and OTP=OTP. |
| DCS | string | Data coding value (Default is 0 for normal message, Set 8 for unicode sms). |
| flashsms | string | Flash message immediate display (Default is 0 for normal sms, Set 1 for immediate display). |
| number | string | Recipient mobile number (pass with comma[,] seprated if need to send on more then one number). |
| text | text | Your SMS content. |
| route | string | Pass the route id in this parameter to route the message. Click Here for more information regarding your routeid. |
| schedtime | string | Schedule date and time for scheduling message (DateTime formate will be 2014/10/06 20:30:00 PM yyyy/mm/dd hh:mm:ss PM). |
| groupid | string | group id for numbers. |
Step 3: Test and Save the settings
Click Send Test SMS to verify whether the configuration is correct. After a successful test, Click Save to save the settings.
Step 4: Delivery Tracking
Delivery tracking allows you to track the delivery status of the SMS messages sent using custom connectors. Delivery tracking will show a metric - Delivered, which helps you understand whether messages have been delivered to the user and analyze delivery failures and errors.
You can configure delivery tracking after creating the sender in the MoEngage Dashboard. For information about Delivery Tracking, refer to Delivery Tracking in Custom Connectors.
Here is the sample response:
Mapping Guide: You can either map the fields from the delivery response or map the fields manually by choosing the desired option. This mapping helps MoEngage to understand the custom connector's delivery response.
Refer to the below image for reference:
Then, Click Save to Save the delivery tracking configuration for the custom connector.